

Overview #
This document will only guide through the process of downloading and running Windows 10 IoT Enterprise over TRUX-iMX8M-Q01.
Hardware Requirements #
- TRUX-iMX8M-Q01 SOM
- TRUX-iMX8-DVP
- HDMI Cable
- HDMI Display
- SD card
- USB Debugging (optional)
Software Requirements #
- NXP based BSP (Version W21H2-1-2-0)
- Download the pre made binaries of BSP from https://www.nxp.com/design/software/embedded-software/i-mx-software/windows-10-iot-enterprise-for-i-mx-applications-processors:IMXWIN10IOT. Make sure to login with NXP account before downloading.
- Windows 10 IOT Enterprise Image
- Download “Windows 10 IoT
Enterprise LTSC 2021″ (provided by Microsoft). The default architecture of the image is x64 make sure it is for ARM64.
- Download “Windows 10 IoT
- CFIMAGER
- Download CFIMAGER tool available over NXP website. https://www.nxp.com/webapp/sps/download/preDownload.jsp . Make sure to login with NXP account before downloading.
- WINDOWS ADK and WinPE
- Download Windows ADK and WinPE version 2004 available over Microsoft Website or link below https://learn.microsoft.com/en-us/windows-hardware/get-started/adk-install
Quick Setup #
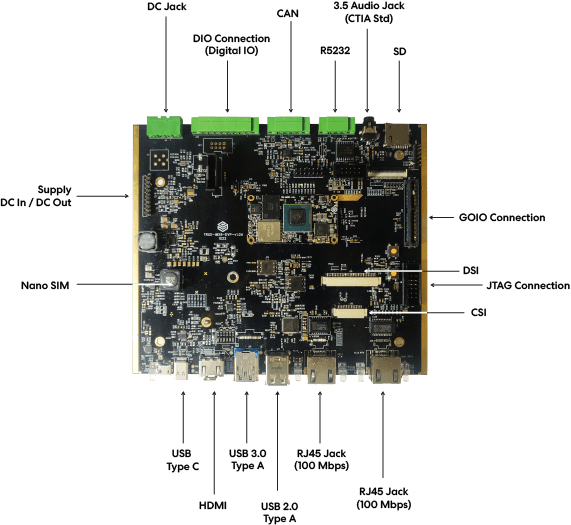
Before Creating OS first need to setup hardware. For setting up hardware, Insert TRUX-iMX8M-Q01 SOM over TRUX-iMX8-DVP and insert HDMI Cable on HDMI port of TRUX-iMX8-DVP. Please refer below image.
For USB debugging, Insert USB B cable on USB B port available on TRUX-iMX8-DVP. Open Serial Monitor on Screen “Tera Term or Putty”. Get connected to COM port of TRUX-iMX8-DVP, set the baud rate “921600” bauds, 8-bit, one-stop bit.
Now set SW2 switch to OFF condition to boot from SD card.
Flashing Windows IoT image #
The Windows IoT image must be flashed into eMMC. To flash Windows IoT image to eMMC an WinPE (Windows Preinstallation) environment has to be created. To create WinPE environment
Setting up BSP-DIR #
- Download and Extract NXP-BSP to <BSP-DIR>
- Mount the Windows IoT image ISO and copy install.vim from mount-dir\sources\install.vim to <BSP-DIR>\IoTEntOnNXP\
- Now Download and Extract CFIMAGER tool and copy CFimager.exe to <BSP-DIR>\firmware\
Creating WinPE SD-card Layout #
- Open elevated command promt and got to <BSP-DIR>\IoTEntOnNXP path.
- Now Execute the below command. This command will create WinPE SD-card layout in <BSP-DIR>\IoTEntOnNXP\
make-winpe-enterprise.cmd /disable_updates /disable_transparency /patch_sdport /test_signing
3. Now to Flash WinPE SD-card layout into SD Card Insert SD card. Execute below commands.
wmic diskdrive list brief (Check the physical SD card Drive number)

make-winpe-enterprise.cmd /apply <PhysicalDrive number For Example make-winpe-enterprise.cmd /apply 1> (WARNING: THIS COMMAND FORMATS DRIVE. SELECTING WRONG PHYSICALDRIVE NUMBER MAY LEAD TO FORMAT OF HARDDISK )
4. Now we need to flash firmware into SD card. To flash firmware into SD card, Execute below command.
cd <BSP-DIR>\firmware

flash_bootloader.cmd /device MX8M_EVK /target_drive <Drive letter For Example flash_bootloader.cmd /device MX8M_EVK /target_drive h:>
At this stage SD card is ready to be booted.
Booting into Windows 10 IOT Image #
To boot with Windows 10 IOT Image. Follow Below Steps.
- Follow point 4 Quick Setup Guide
- Power OFF TRUX-iMX8-DVP
- Insert WinPE SD card into SD-card slot.
- Power ON the Board.
- Now WinPE will automatically install Windows 10 IOT Image into eMMC.
This process may take aroud 30 minsto 45 mins. After installation of Windows 10 IOT Image the Windows will boot automatically. There is no need to remove SD-card from SD card slot as WinPE renames “EFI” folder to “_efi” which allows windows to boot from eMMC even SD-card is inserted.